Lab 6 Output: Piezo Speakers
- Due Oct 11, 2017 by 10:30am
- Points 10
- Submitting a file upload
- File Types pdf
Before the Lab
You should have experiments with the force sensitive resistor (FSR) and photocell to control your LEDs. You should have also used the force sensitive resistor and photosensor to control a Processing program on your computer. Congratulations!
In Lab Exercise
Notes
If you finish early, please use the extra time to solder some wires onto your motor, which we will be using in the near future.
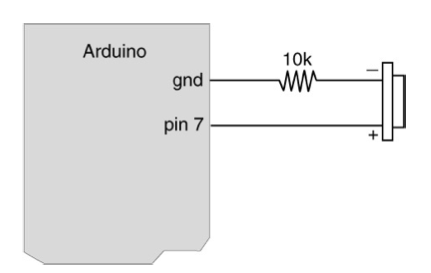
Always remember what pin you are using for different parts! Some of the diagrams in this lab use pin 7 or pin 8 for the piezo speaker. Either is fine. It is up to you to make sure that whatever pin you choose for your circuit matches the pin number specified in your code.
Objective
Using the piezo to make sound.
Activities
PART 1 – THE PIEZO BUZZER
1. Follow the tutorial here to use the piezo buzzer to play a melody.
https://www.arduino.cc/en/Tutorial/toneMelody Links to an external site.
You might find that the connection between the piezo speaker and the Arduino board is a bit loose. The piezo speaker has thin wires. They make a tighter fit with the breadboard. So, you can try plugging the piezo speaker into the breadboard and then using jumper cables to connect to the Arduino. Even with the addition of the breadboard, this is still making the "same" circuit as shown in the Arduino tutorial linked to above.
Note that you can press the RESET button on the corner of your Arduino to make it restart the same code over again without re-uploading.
2. This sample code lets you control the note using Serial input. You also need to use the "pitches.h" file described in the Arduino tutorial linked to above.
/* Sound Serial (aka Keyboard Serial)
 * ------------
 * Program to play tones depending on input from the serial port.
 *
 * Noura Howell, 2 October 2017
 * http://nourahowell.com/
 */

#include "pitches.h"

int speakerPin = 8;

// the keyboard input to specify notes
char noteNames[] = { 'c', 'd', 'e', 'f', 'g', 'a', 'b', 'C' };

// the corresponding notes are defined in pitches.h
unsigned int tones[] = { NOTE_C4, NOTE_D4, NOTE_E4, NOTE_F4, NOTE_G4, NOTE_A4, NOTE_B4, NOTE_C5 };

int noteDuration = 100; // ms

// the note the user wants to play that we read from serial
char serNote;

void setup() {
  pinMode(speakerPin, OUTPUT);
  Serial.begin(9600);
  Serial.println("enter a note to play (e.g., 'c') :");
}

void loop() {
  while ( Serial.available() ) {
    // hopefully this char matches an element in noteNames
    serNote = Serial.read();
    Serial.print("We just got some input from serial: ");
    Serial.println(serNote);

    // we'll check every element of noteNames to try to find a match
    // note that 8 is a 'magic' number for the length of noteNames array
    for (int i = 0; i < 8; i++) {
      if ( serNote == noteNames[i] ) { // found a match
        Serial.print(serNote);
        Serial.println(" is a note we can play.");

        // play the note
        tone(speakerPin, tones[i], noteDuration);
        // to distinguish the notes, set a minimum time between them.
        // the note's duration + 30% seems to work well:
        int pauseBetweenNotes = noteDuration * 1.3;
        delay(pauseBetweenNotes);
        // stop the tone playing:
        noTone(8);
      }
    }
  }
}
3. If you want to reduce the volume of the piezo speaker, you can add a resistor in series with the speaker:
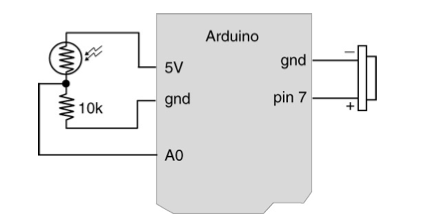
PART 2 –MAKE A THEREMIN
A Theremin is an instrument designed to be played without being touched. You will make one here using your piezo buzzer and the photosensor.
1. Build the Theremin circuit. Note that this is just the photocell circuit and the piezo circuit combined.
2. The software to control the Theremin is here:
/* Theremin
 * --------
 *
 * Created 24 October 2006
 * copyleft 2006 Tod E. Kurt tod@todbot.com
 * http://todbot.com/
 *
 * Adapted by Noura Howell, 2 October 2017
 * http://nourahowell.com/
 */

int photocellPin = 0;
int speakerPin = 8;

int photocellVal = 0;
int toneVal;

// try changing the noteDuration to hear how that changes the sound
int noteDuration = 10; // ms

void setup() {
  pinMode(speakerPin, OUTPUT);
  Serial.begin(9600);
}

void loop() {
  // read the value from the sensor
  photocellVal = analogRead(photocellPin);
  Serial.print("photocellVal: ");Serial.println(photocellVal);

  // decide what tone to play based on the sensor value
  // try changing this calculation to hear how that changes the sound
  toneVal = photocellVal * 3;

  // play the tone
  tone(speakerPin, toneVal, noteDuration);
  // to distinguish the notes, set a minimum time between them.
  // the note's duration + 30% seems to work well:
  // try changing the pauseBetweenNotes to hear how that changes the sound
  int pauseBetweenNotes = noteDuration * 1.3;
  delay(pauseBetweenNotes);
  // stop the tone playing:
  noTone(8);
}
Homework
Input output coincidence exercise. Design an artifact where both input and output occur at the same place. Use any combination of your input transducers and output transducers (pot, photocell, FSR, LEDs, piezo, screen). E.g., a ball that changes colors and/or plays different sound/melody depending on the pressure being applied. A stick you can twist to color or sound differently… These are just examples to spark your imagination. Be creative!
Extra Audio Fun
This section is not required, but if you are interested in weird sounds, you might enjoy further exploring what you can do with piezo and digital audio.
Exploring different materials with audio
We provided with you a piezo speaker, which is the piezo material plus a plastic casing around it that acts as the speaker. When the piezo material vibrates, the plastic casing (speakers) helps shape and amplify the sound. Using other materials or shapes for the speaker can result in very different sounds!
"Liberating" the piezo material from its dinky plastic casing requires taking some risks. It might break the piezo speaker! But, it is possible to very carefully cut away the plastic material (starting from the edges) and then gently pry out the plastic metal disk within. Inside is a little metal disk with the black and red wires soldered to it. It's quite fragile.
The piezo material is a transducer that converts between electrical energy and physical movement. So, when you send a rapidly shifting up/down PWM electrical signal to the piezo, it vibrates like a square wave. It also goes the other way, where physical energy applied to the piezo (like scratching, vibrating, etc.) gets transformed into an electrical signal. So, the piezo can be both an input OR output device, and it is used both ways in electroacoustic music. Often when used as an output it's called a "transducer" and when used as an input it's called a "contact mic" short for "contact microphone".
As an output device, on its own it is very quiet. If you tape it to a paper cup, it will amplify the sound. Here the paper cup is acting as the speaker. How does it sound different if you put your ear to the opening of the cup? How does it sound different if you tape it to different parts of the cup?
What other objects can you use for shaping and amplifying the sound? You can really try a lot of different materials here. One important consideration is that the piezo round metal disk should be firmly attached (probably with tape) to the material, so that the piezo round metal disk is free to vibrate while its vibrations readily transfer to the material.
Exploring digital audio
Try changing some of the variables and calculations in the Arduino code to differently translate the photocell sensor reading into the audio output. How does it change the sound when you change the toneDuration, or the pauseBetweenNotes, or the way that toneVal is calculated based on the sensor reading? Can you program in different rhythms? Can you make it sound more crunchy, or more smooth?
Going further
These explorations are pretty simple, but there is a lot of electroacoustic music and sound art made with these techniques! Just some links to keep exploring:
http://www.everydaylistening.com/articles/tag/piezo Links to an external site.
http://totemcontemporain.com/groups/rust-noise-music-duo Links to an external site.
https://www.youtube.com/watch?v=vm_OklTipCk
Links to an external site.
https://www.arduino.cc/en/Tutorial/KnockSensor Links to an external site.
 Find Rubric
